Getting Started with Kubernetes
Docker and Kubernetes has revolutionized how we build and run the applications. In recent years containerization becomes new normal, and many organizations start using Kubernetes as Container Orchestration Platform.
I was curious about Kubernetes and played with it a bit 3 years ago but I thought let’s wait and see is it going to be a real thing or just another over hyped technology. Now I see Kubernetes everywhere, especially where microservice architecture is used for their systems. So, I finally decided to learn it properly and share my learning along the way.
- 1. Getting Started with Kubernetes
- 2. Kubernetes - Releasing a new version of the application using Deployment Rolling Updates
- 3. Kubernetes - Blue/Green Deployments
- 4. Kubernetes - Exposing Services to outside of Cluster using Ingress
In this article we will learn:
- Creating a docker image from a SpringBoot application
- Understanding the Need for Kubernetes
- Local kubernetes setup using Minikube
- Overview of Kubernetes Objects
- Run the SpringBoot app in a Pod
- Scaling the application using Deployment
- Exposing the Deployment as a Service
1. Creating a docker image from a SpringBoot application
We are going to build a simple SpringBoot application which we are going to use for this tutorial. Go to Spring Initializr and select Web, Actuator and Lombok starters and generate the application. You can click Here to generate the application with desired starters already selected.
Our SpringBoot application is going to be a very simple one as our goal here is to learn Kubernetes, not exploring SpringBoot’s super powers.
Create a REST Controller as follows:
package com.sivalabs.k8sbootdemo;

import lombok.extern.slf4j.Slf4j;
import org.springframework.beans.factory.annotation.Value;
import org.springframework.web.bind.annotation.GetMapping;
import org.springframework.web.bind.annotation.RestController;

import java.net.InetAddress;
import java.time.LocalDateTime;
import java.util.Map;

@RestController
@Slf4j
public class DemoController {

    @Value("${app.version}")
    private String version;

    @GetMapping({"", "/api/info"})
    public Map<String, String> apiInfo()
    {
        log.info("Request for apiInfo at : {}", LocalDateTime.now());
        return Map.of("app", "K8S SpringBoot Demo",
                "hostName", getHostname(),
                "version", version);
    }

    @GetMapping("/api/terminate")
    public String terminate()
    {
        log.info("Request for terminate at : {}", LocalDateTime.now());
        System.exit(1); //give the developer a medal for writing this line in a web app
        return "I'll be BACK";
    }

    private String getHostname() {
        String hostName = "Unknown";
        try {
            InetAddress addr = InetAddress.getLocalHost();
            hostName = addr.getHostName();
        } catch (Exception e) {
            log.error("Error in getting hostname", e);
        }
        return hostName;
    }
}
Configure the following properties in src/main/resources/application.properties
spring.application.name=k8s-boot-demo
management.endpoints.web.exposure.include=*
app.version=v1
We can use SpringBoot Maven Plugin itself to build the Docker image or we can use Jib plugin. Let’s use Jib Maven plugin to build the Docker Image and push it to DockerHub.
Add the following plugin in pom.xml
<properties>
    <java.version>11</java.version>
    <dockerhub.username>sivaprasadreddy</dockerhub.username>
    <docker.tag>v1</docker.tag>
</properties>
<build>
  <plugins>
    ...
    ...
    <plugin>
        <groupId>com.google.cloud.tools</groupId>
        <artifactId>jib-maven-plugin</artifactId>
        <version>2.7.0</version>
        <configuration>
            <from>
                <image>gcr.io/distroless/java:11</image>
            </from>
            <to>
                <image>${dockerhub.username}/${project.artifactId}:${docker.tag}</image>
            </to>
            <container>
                <ports>
                    <port>8080</port>
                </ports>
            </container>
        </configuration>
    </plugin>
  <plugins>
</build>
Before pushing the image to DockerHub, first you need to authenticate with DockerHub.
$ docker login
$ ./mvnw clean package jib:build
Now the docker image will be created and pushed to your DockerHub registry.
You can quickly verify it using the following command:
$ docker run -p 8080:8080 sivaprasadreddy/k8s-boot-demo:v1
Now we should be able to access http://localhost:8080/api/info and see the following JSON response:
{
    "version": "v1",
    "app": "K8S SpringBoot Demo",
    "hostName": "61490b6bb05d"
}
2. Understanding the Need for Kubernetes
In the previous step we were able to build a docker image from our SpringBoot application and also run it using Docker. We have already verified that it is working fine by invoking an API endpoint.
Let’s call another endpoint that we created http://localhost:8080/api/terminate
We won’t see any response and if we check the console you can notice that the container exited.
If we look at the code of /api/terminate API handler method we are calling System.exit(1) which is killing the container.
Yes, that’s a poor man’s simulation of container crashed due to some problems like
OutOfMemoryetc… 😉
Here the problem is once the container is crashed our application is dead. It won’t restart itself or spin up another container automatically without human intervention. While this is fine for a demo, but for running in production this is not acceptable.
In production environment we want to make sure always the application is up and running and also we want to run N instances to serve the high traffic. This is where Container Orchestration tools like Kubernetes come into picture.
We can instruct Kubernetes to run 5 instances of our application and Kubernetes will take care of running 5 instances all the time. If one container got crashed due to any issue then Kubernetes takes care of spinning up another container to make sure 5 containers are running as instructed.
That’s enough of theory, let’s get our hands on Kubernetes.
3. Local kubernetes setup using Minikube
There are few options to run a Kubernetes Cluster locally such as Minikube, Kind, K3s etc. I felt Minikube is the easiest way to get up and running compared to others.
Install Minikube
Let’s install Minikube which can be used to create a single node kubernetes cluster locally. You can checkout the Minikube Docs and follow the installation steps based on your OS. For MacOS you can simply install using brew install minikube
Once minikube is installed create a cluster using the following command:
$ minikube start --memory 4096 --driver=virtualbox
Install kubectl
We need to install kubectl commandline tool which will be used to communicate with the kubernetes cluster. Follow the instructions at https://kubernetes.io/docs/tasks/tools/ to install kubectl based on your OS.
For MacOS you can simply install using brew install kubectl
Verify the installation:
$ kubectl version
$ minikube version
Now that we have the required tools installed, before jumping onto running containers we need to understand about few Kubernetes Objects.
4. Overview of Kubernetes Objects
There are many Kubernetes Objects that we commonly use such as Pod, Deployment, Service, ConfigMap, Secrets, Persistent Volumes, Jobs, CronJobs, ServiceAccount etc. Instead of dumping everything at once on your head we will explore them as and when required.
Pod: A Pod is the smallest deployable unit which encapsulates one or more containers. Most of the times there will be only one container in a pod but there are cases where we need to run multiple containers in a single pod.
Deployment: A Deployment takes care of maintaining the desired state such as “there should be 3 replicas of this pod”. Deployment uses ReplicaSets to scale up or down based on the desired state. Deployments can also be used to perform rolling updates, Blue/Green Deployments etc.
Service: A Service exposes the deployment by providing a single interface (IP Address) to a set of Pods effectively working as a LoadBalancer.
Knowing about these 3 Object types is enough to start with and we will learn about other Object types along the way.
5. Run the SpringBoot app in a Pod
There are 2 ways we can deploy kubernetes objects:
- Imperative way using kubernetes run or kubernetes create commands.
- Declarative way using YAML Manifest files
While imperative way comes handy to run adhoc commands to explore things, Declarative way is more maintainable in real projects. So we are going to follow Declarative way using YAML files.
k8s/pod.yml
kind: Pod
apiVersion: v1
metadata:
  name: k8s-boot-demo-pod
spec:
  containers:
    - name: k8s-boot-demo
      image: sivaprasadreddy/k8s-boot-demo:v1
      imagePullPolicy: Always
      ports:
        - containerPort: 8080
Explanation of Pod definition:
- We are defining the object type as Pod using kind property
- We are giving a name to the pod in metadata section. We can also define the namespace and label etc which are optional.
- We are defining the container details as part of spec, for now we have only one container.
Let’s deploy the pod on Minikube cluster:
$ kubectl apply -f k8s/pod.yaml
$ kubectl get pods -o wide

$ kubectl describe pods k8s-boot-demo-pod // to see more details of the pod
$ kubectl logs k8s-boot-demo-pod //to view logs of the pod
We are able to see our pod deployed successfully and see all the pod details using kubectl describe command, and we can even see our SpringBoot application logs.
But we can’t invoke any API endpoint as Pod is running within the container only and it is not accessible from outside the cluster.
Well, there is a way. We can ssh into minikube and from there we can invoke the API.
$ minikube ssh
$ curl 172.17.0.5:8080/api/info
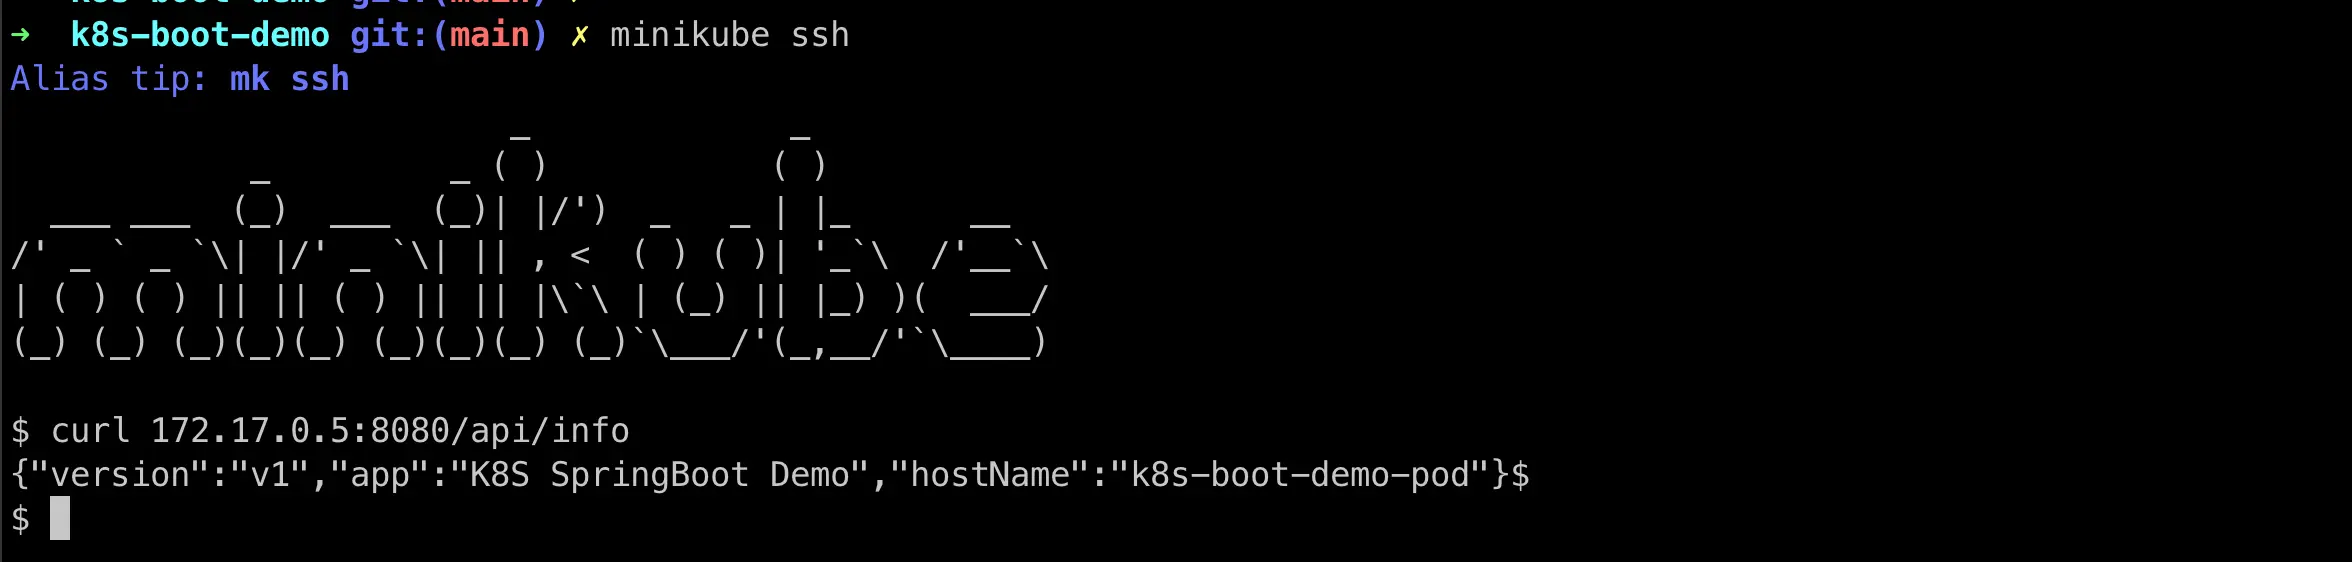
Cool, we are able to call our API Endpoint. Let’s try to call /api/terminate endpoint.
$ minikube ssh
$ curl 172.17.0.5:8080/api/terminate
When the /api/terminate endpoint is called container got crashed and Kubernetes restarted the container as the default restartPolicy is Always. Now if you see the pod details it is in Running state and RESTARTS is 1.
Let’s update restartPolicy to Never and see what happens when a container crashed.
k8s/pod.yml
kind: Pod
apiVersion: v1
metadata:
  name: k8s-boot-demo-pod
spec:
  restartPolicy: Never
  containers:
    - name: k8s-boot-demo
      image: sivaprasadreddy/k8s-boot-demo:v1
      imagePullPolicy: Always
      ports:
        - containerPort: 8080
Only certain fields are allowed to update for an existing pod and restartPolicy is not one of them. So let’s first delete the pod and recreate it.
$ kubectl delete -f k8s/pod.yaml
$ kubectl apply -f k8s/pod.yaml
$ kubectl get pod k8s-boot-demo-pod -o wide
Now if we ssh into minikube and invoke /api/terminate endpoint and see the pod status it will show as Error and the spring boot application is no longer running.
We learned how to run a pod and how it behaves when a container got crashed depending on restartPolicy setting.
Now, let us see how we can scale up or scale down the number of pods using Deployments.
6. Scaling the application using Deployment
We can use Kubernetes Deployment to make sure N replicas of pods available all the time. In addition to that Deployments can also be used to perform rolling updates, Blue/Green deployments etc. But in this article we will just see how we can use Deployments to run 3 replicas of SpringBoot application.
k8s/deployment.yaml
apiVersion: apps/v1
kind: Deployment
metadata:
  name: k8s-boot-demo-deployment
spec:
  replicas: 3
  selector:
    matchLabels:
      app: k8s-boot-demo
  template:
    metadata:
      labels:
        app: k8s-boot-demo
    spec:
      containers:
        - name: k8s-boot-demo
          image: sivaprasadreddy/k8s-boot-demo:v1
          ports:
            - containerPort: 8080
Explanation of the Deployment Manifest:
- We are defining the object type as Deployment using kind property
- If you notice spec.template child section of Deployment it is same as Pod definition with a label added.
- The restartPolicy property of Pod is removed because for a Deployment the only valid value is Always.
- The association between Deployment and Pods are through matching labels. The pad has label app: k8s-boot-demo and Deployment’s spec.selector.matchLabels has same label app: k8s-boot-demo.
- We have specified the number of replicas we want to have using spec.replicas field.
$ kubectl delete -f k8s/pod.yaml
$ kubectl apply -f k8s/deployment.yaml
$ kubectl get all
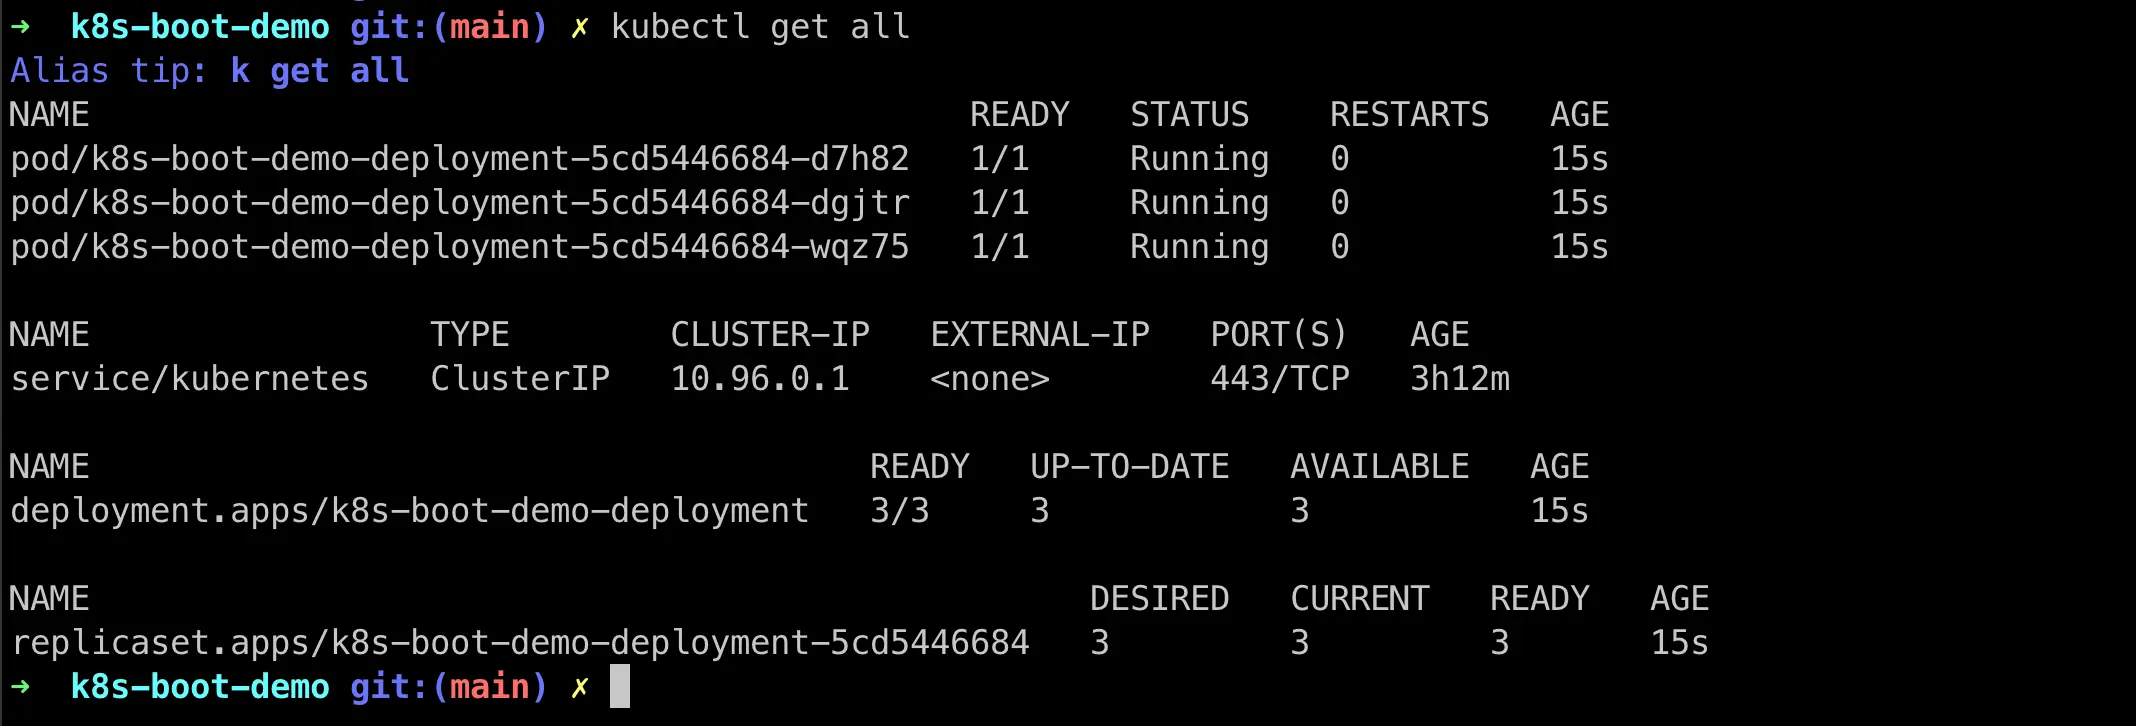
We can see 3 Pods, 1 ReplicaSet and 1 Deployment got created.
Now let us delete a Pod and see what happens.
$ kubectl delete pod k8s-boot-demo-deployment-5cd5446684-d7h82
$ kubectl get all
Now you can notice a new a pod got created automatically to match the current state (2 pods) to the desired state(3 pods).
We can easily scale up and down either changing the replicas in deployment.yaml or using the kubectl scale command.
$ kubectl scale deployment k8s-boot-demo-deployment --replicas=5
$ kubectl get all
Let us see what happens if a Pod crashed. As we did earlier get one Pod’s IP address, ssh into minikube and call /api/terminate endpoint.
You should see the pod automatically restarted to match the desired replica count.
We are able to scale up or down using Deployments, but we are still calling APIs on specific pods.
In the next section we will see how to use Kubernetes Services which act as a LoadBalancer and provide a way to call our APIs from outside the cluster.
7. Exposing the Deployment as a Service
Let’s create a Service definition using YAML file as follows:
apiVersion: v1
kind: Service
metadata:
  name: k8s-boot-demo-service
spec:
  type: NodePort
  selector:
    app: k8s-boot-demo
  ports:
    - name: app-port-mapping
      protocol: TCP
      port: 8080
      targetPort: 8080
      nodePort: 30090
Explanation of the Service Manifest:
- We are defining the object type as Service using kind property
- The association between Service and Pods are through matching labels. The pad has label app: k8s-boot-demo and Service’s spec.selector has same label app: k8s-boot-demo. So, this Service will act as a load balancer to all the pods which has label app: k8s-boot-demo.
- We have specified the type as NodePort which exposes the port 30090 on Cluster Node and forward the requests to Pod’s 8080 port which in turn forwards to Container’s 8080 port.
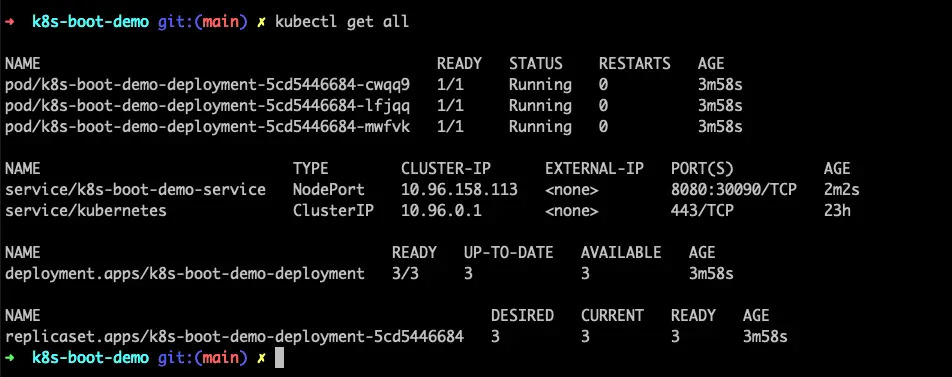
$ kubectl apply -f k8s/deployment.yaml
$ kubectl apply -f k8s/service.yaml
$ kubectl get all
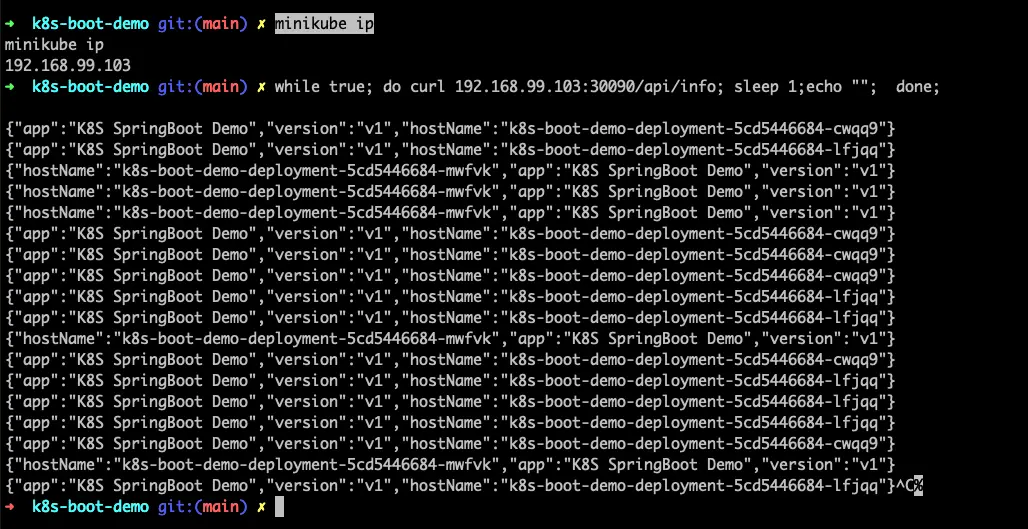
We can access the service using minikube IP on nodePort 30090.
$ minikube ip
192.168.99.103
$ curl 192.168.99.103:30090/api/info
$ while true; do curl 192.168.99.103:30090/api/info; sleep 1; echo "";  done;
You can see requests are serving from different pods by checking the hostName in the response.
Tips
- Use Kubectl autocomplete https://kubernetes.io/docs/reference/kubectl/cheatsheet/#kubectl-autocomplete
- Instead of writing Manifest YAML files from scratch you can generate them as follows:
$ kubectl run k8s-boot-demo --image=sivaprasadreddy/k8s-boot-demo:v1 --dry-run=client -o yaml
This will print the following Pod definition yaml in console.
apiVersion: v1
kind: Pod
metadata:
  creationTimestamp: null
  labels:
    run: k8s-boot-demo
  name: k8s-boot-demo
spec:
  containers:
  - image: sivaprasadreddy/k8s-boot-demo:v1
    name: k8s-boot-demo
    resources: {}
  dnsPolicy: ClusterFirst
  restartPolicy: Always
status: {}
Using –dry-run=client -0 yaml we can generate the YAML without actually creating such resource.
Similarly, we can generate manifest YAML for Deployment as well.
$ kubectl create deployment k8s-boot-demo-deployment --image=sivaprasadreddy/k8s-boot-demo:v1 --dry-run=client -o yaml > deployment.yaml
This will write the following Deployment manifest YAM to deployment.yaml file.
apiVersion: apps/v1
kind: Deployment
metadata:
  creationTimestamp: null
  labels:
    app: k8s-boot-demo-deployment
  name: k8s-boot-demo-deployment
spec:
  replicas: 1
  selector:
    matchLabels:
      app: k8s-boot-demo-deployment
  strategy: {}
  template:
    metadata:
      creationTimestamp: null
      labels:
        app: k8s-boot-demo-deployment
    spec:
      containers:
      - image: sivaprasadreddy/k8s-boot-demo:v1
        name: k8s-boot-demo
        resources: {}
status: {}
- You can use Lens as a GUI client for Kubernetes
- If you are terminal person then k9s or KDash comes very handy
Summary
We have covered some basics of getting started with Kubernetes and learn how to use Pods, Deployments and Services. But we just scratched the surface, there are plenty of things to know. Though we are able to call our API using Service NodePort, in a multi-node cluster environment we might want to use Ingress mapping a domain name to a services deployed on multiple nodes.
In the next part we will see how to release a new version of the application using Deployment Rolling Updates.
Related content
- Kubernetes - Exposing Services to outside of Cluster using Ingress
- Kubernetes - Blue/Green Deployments
- Kubernetes - Releasing a new version of the application using Deployment Rolling Updates
- Kubernetes Tutorials
- Code simplicity by Abstraction vs Verbosity