Kubernetes - Releasing a new version of the application using Deployment Rolling Updates
In the previous article Getting Started with Kubernetes we have learned how to deploy a SpringBoot application on Kubernetes(Minikube) using Deployment and Service primitives. We also looked at how to access our application using NodePort on Minikube IP address.
- 1. Getting Started with Kubernetes
- 2. Kubernetes - Releasing a new version of the application using Deployment Rolling Updates
- 3. Kubernetes - Blue/Green Deployments
- 4. Kubernetes - Exposing Services to outside of Cluster using Ingress
In this article, we are going to learn:
- How to release a new version of application using Deployment Rolling Updates?
- How to use Readiness and Liveness probes to route traffic to only fully initialized containers?
1. Build new version of the application
If you look at the previous article SpringBoot application code we have used @Value to bind the app.version property and hard coded app title “K8S SpringBoot Demo”. Let’s update the code to use @ConfigurationProperties instead of @Value and make app.title also a configurable parameter.
ApplicationProperties.java
package com.sivalabs.k8sbootdemo;

import lombok.Getter;
import lombok.Setter;
import org.springframework.boot.context.properties.ConfigurationProperties;

@ConfigurationProperties(prefix = "app")
@Setter
@Getter
public class ApplicationProperties {
    private String version;
    private String title;
}
K8sBootDemoApplication.java
package com.sivalabs.k8sbootdemo;

import org.springframework.boot.SpringApplication;
import org.springframework.boot.autoconfigure.SpringBootApplication;
import org.springframework.boot.context.properties.EnableConfigurationProperties;

@SpringBootApplication
@EnableConfigurationProperties(ApplicationProperties.class)
public class K8sBootDemoApplication {

	public static void main(String[] args) {
		SpringApplication.run(K8sBootDemoApplication.class, args);
	}
}
src/main/resources/application.properties
spring.application.name=k8s-boot-demo
management.endpoints.web.exposure.include=*
app.version=v2
app.title=K8S SpringBoot Demo
AppInfo.java
package com.sivalabs.k8sbootdemo;

import com.fasterxml.jackson.annotation.JsonPropertyOrder;
import lombok.AllArgsConstructor;
import lombok.Getter;
import lombok.NoArgsConstructor;
import lombok.Setter;

@Setter
@Getter
@NoArgsConstructor
@AllArgsConstructor
@JsonPropertyOrder({"version", "app", "hostName"})
public class AppInfo {
    private String version;
    private String app;
    private String hostName;
}
DemoController.java
package com.sivalabs.k8sbootdemo;

import lombok.RequiredArgsConstructor;
import lombok.extern.slf4j.Slf4j;
import org.springframework.web.bind.annotation.GetMapping;
import org.springframework.web.bind.annotation.RestController;

import java.time.LocalDateTime;

@RestController
@RequiredArgsConstructor
@Slf4j
public class DemoController {
    private final ApplicationProperties properties;

    @GetMapping({"", "/api/info"})
    public AppInfo apiInfo()
    {
        log.info("Request for apiInfo at : {}", LocalDateTime.now());
        return new AppInfo(properties.getVersion(), properties.getTitle(), getHostname());
    }
    ...
    ...
}
Finally, in pom.xml update <docker.tag>v1</docker.tag> to <docker.tag>v2</docker.tag>, build and push the new image with v2 tag to DockerHub using following command:
$ ./mvnw clean package jib:build
2. Deploy application of version v1
First let us deploy the current v1 version of the application using Deployment and Service primitives as follows:
app.yaml
apiVersion: apps/v1
kind: Deployment
metadata:
  name: k8s-boot-demo-deployment
spec:
  replicas: 6
  strategy:
    type: RollingUpdate
  selector:
    matchLabels:
      app: k8s-boot-demo
  template:
    metadata:
      labels:
        app: k8s-boot-demo
    spec:
      containers:
        - name: k8s-boot-demo
          image: sivaprasadreddy/k8s-boot-demo:v1
          imagePullPolicy: Always
          ports:
            - containerPort: 8080
---
apiVersion: v1
kind: Service
metadata:
  name: k8s-boot-demo-service
spec:
  type: NodePort
  selector:
    app: k8s-boot-demo
  ports:
    - name: app-port-mapping
      protocol: TCP
      port: 8080
      targetPort: 8080
      nodePort: 30090
Explanation of Deployment Strategy:
- We are using RollingUpdate strategy (which is default) for our Deployment. The RollingUpdate strategy creates the new pods with new container images and then terminate the old pods.
- There won’t be complete downtime as there will always be pods (old and new) accepting requests
- For some time both old and new pods will be running parallelly so application needs to be able to handle it
- Another Deployment strategy option is Recreate which will delete all the existing pods first and then create new pods, so there will be application downtime.
Let’s deploy the application using following command and access the application:
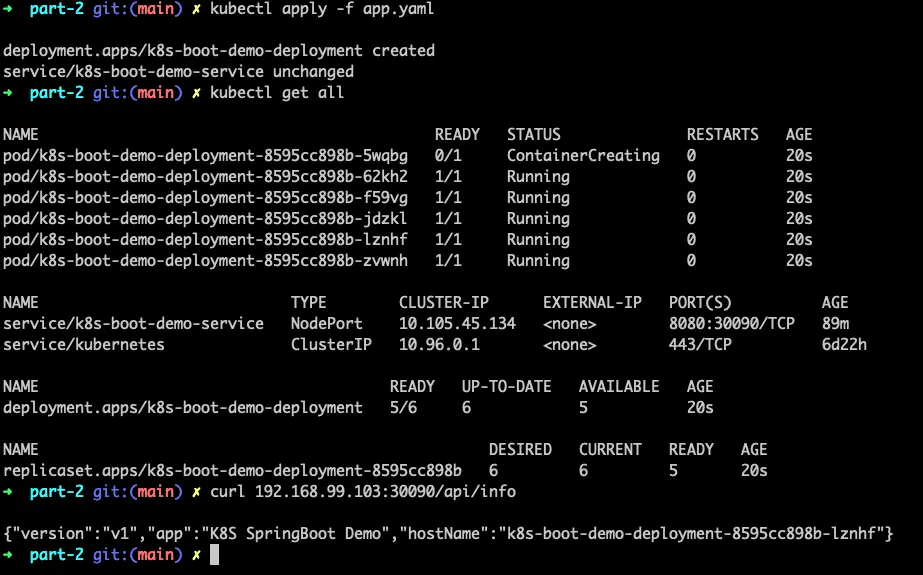
$ kubectl apply -f app.yaml
$ kubectl get all
$ minikube ip
192.168.99.103
$ curl 192.168.99.103:30090/api/info
{"version":"v1","app":"K8S SpringBoot Demo","hostName":"k8s-boot-demo-deployment-8595cc898b-lznhf"}
3. Deploy new version v2 using Deployment Rolling Updates
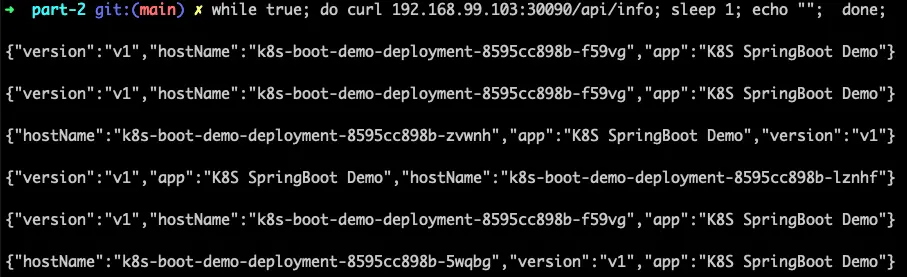
As our new version v2 image is already pushed to DockerHub, all we need to do is update app.yaml to use sivaprasadreddy/k8s-boot-demo:v2 image. But before that let’s open one terminal window and run the CURL command to continuously call the API endpoint as follows:
$ while true; do curl 192.168.99.103:30090/api/info; sleep 1; done;
Now, update app.yaml to use sivaprasadreddy/k8s-boot-demo:v2 as image and apply the changes in a new terminal window.
$ kubectl apply -f app.yaml
$ kubectl get all
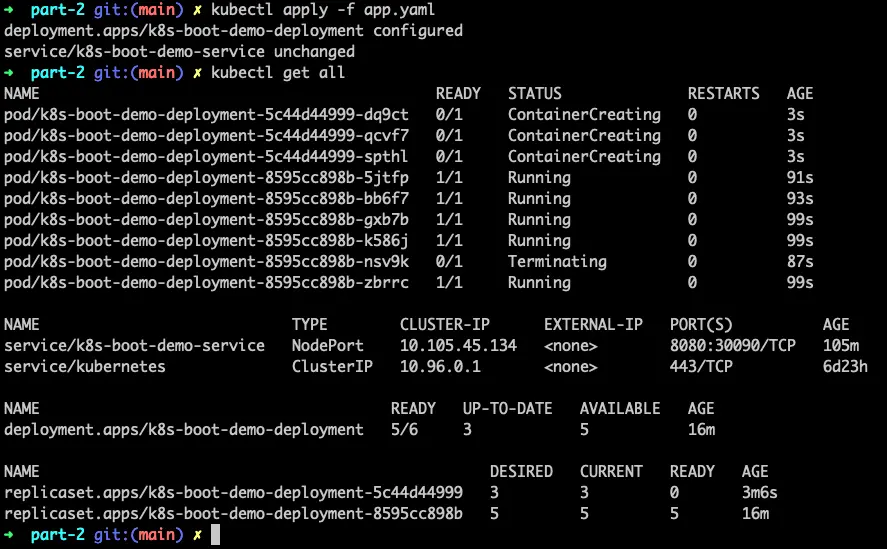
You can see the old pods being Terminated and new pods getting created.
Now if you take a look at the first Terminal window where we are calling API continuously you can see some errors as follows:
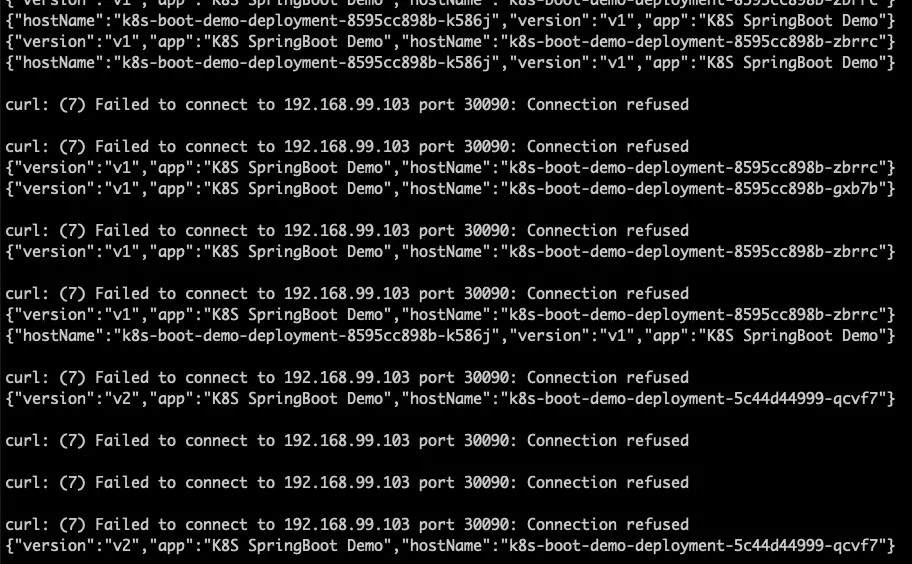
For some calls we are getting response successfully and for some it is failing with curl: (7) Failed to connect to 192.168.99.103 port 30090: Connection refused error.
The reason is when we are calling API using Service NodePort Kubernetes is forwarding the requests to all the pods with label app: k8s-boot-demo without checking whether the application is fully initialized and ready to accept the requests or not.
We can use Readiness and Liveness probes to overcome this problem.
4. Using Readiness and Liveness probes
The Readiness state indicates whether the application is ready to accept client requests or not. If the Readiness state is unready, Kubernetes will not route traffic to this instance(pod).
The Liveness state of an application indicates whether the internal state is valid or not. If Liveness is broken, this means that the application itself is in a failed state and cannot recover from it. In this case, Kubernetes will restart the application instance.
You can read more about Readiness and Liveness probes here:
SpringBoot Actuator provides the support for Readiness and Liveness probes out-of-the-box. SpringBoot can automatically detect that the application is running in a Kubernetes environment and enable the probes.
But if you are running the application locally you need to enable the probes explicitly using following configuration:
management.endpoint.health.probes.enabled=true
You can check the Readiness and Liveness of our SpringBoot application by accessing http://192.168.99.103:30090/actuator/health/readiness and http://192.168.99.103:30090/actuator/health/liveness and you will see the response as follows:
{
  "status": "UP"
}
Now we can configure Kubernetes Liveness and Readiness probes using these Actuator endpoints as follows.
apiVersion: apps/v1
kind: Deployment
metadata:
  name: k8s-boot-demo-deployment
spec:
  replicas: 6
  strategy:
    type: RollingUpdate
  selector:
    matchLabels:
      app: k8s-boot-demo
  template:
    metadata:
      labels:
        app: k8s-boot-demo
    spec:
      containers:
        - name: k8s-boot-demo
          image: sivaprasadreddy/k8s-boot-demo:v2
          imagePullPolicy: Always
          ports:
            - containerPort: 8080
          readinessProbe:
            httpGet:
              port: 8080
              path: /actuator/health/readiness
          livenessProbe:
            httpGet:
              port: 8080
              path: /actuator/health/liveness
We have updated the Pod definition within the Deployment to include readinessProbe and livenessProbe fields pointing to Readiness and Liveness HTTP endpoints.
Now let’s test this by deleting the existing deployment, deploy version v1 and then update to v2.
$ kubectl delete deployment.apps/k8s-boot-demo-deployment
$ vi app.yaml //update version to v1
$ kubectl apply -f app.yaml
$ while true; do curl 192.168.99.103:30090/api/info; sleep 1; done;
In a 2nd Terminal window update version to v2 in app.yaml and apply the changes.
$ vi app.yaml //update version to v2
$ kubectl apply -f app.yaml
Now if you check in the first terminal you won’t see curl: (7) Failed to connect to 192.168.99.103 port 30090: Connection refused errors anymore.
In addition to readinessProbe and livenessProbe, Kubernetes also support startupProbe.initialDelaySeconds property which can be used to delay the probes checking for certain period. This comes handy if your application takes some time to fully initialize.
spec:
  containers:
    - name: k8s-boot-demo
      image: sivaprasadreddy/k8s-boot-demo:v2
      imagePullPolicy: Always
      ports:
        - containerPort: 8080
      readinessProbe:
        httpGet:
          port: 8080
          path: /actuator/health/readiness
      livenessProbe:
        httpGet:
          port: 8080
          path: /actuator/health/liveness
      startupProbe:
        initialDelaySeconds: 5
        httpGet:
          port: 8080
          path: /actuator/health/liveness
We have learned how to deploy a new version using RollingUpdate strategy. What if there is an issue with new version and we want to rollback to previous version?
5. Rolling back to previous version
We can check the deployment rollout history as follows:
$ kubectl rollout history deployment.apps/k8s-boot-demo-deployment

deployment.apps/k8s-boot-demo-deployment
REVISION  CHANGE-CAUSE
1         <none>
2         <none>
We can see there are 2 revisions of this deployment. We can see more details about a particular deployment revision as follows:
$ kubectl rollout history deployment.apps/k8s-boot-demo-deployment --revision=2

deployment.apps/k8s-boot-demo-deployment with revision #2
Pod Template:
  Labels:	app=k8s-boot-demo
	pod-template-hash=64d545b968
  Containers:
   k8s-boot-demo:
    Image:	sivaprasadreddy/k8s-boot-demo:v2
    Port:	8080/TCP
    Host Port:	0/TCP
    Liveness:	http-get http://:8080/actuator/health/liveness delay=0s timeout=1s period=10s #success=1 #failure=3
    Readiness:	http-get http://:8080/actuator/health/readiness delay=0s timeout=1s period=10s #success=1 #failure=3
    Environment:	<none>
    Mounts:	<none>
  Volumes:	<none>
Now we can rollback to previous version i.e, v1 as follows:
$ kubectl rollout undo deployment.apps/k8s-boot-demo-deployment
Or you can rollback to a specific revision as follows:
$ kubectl rollout undo deployment.apps/k8s-boot-demo-deployment --to-revision=1
Summary
While using Rollout strategy for Deployments is easy, it expects the application to work properly even when both the old and new versions are running parallelly. This might be a big challenge when it involves database schema changes, external service integrations etc.
We can use Blue/Green Deployment strategy to handle this problem. We will see how we can perform Blue/Green deployments in the next article.
Related content
- Kubernetes - Exposing Services to outside of Cluster using Ingress
- Kubernetes - Blue/Green Deployments
- Getting Started with Kubernetes
- Kubernetes Tutorials
- Code simplicity by Abstraction vs Verbosity